Tuesday, December 24, 2013

Sun and Shade

Seven hours, 34 minutes and 4 seconds.  THAT is how much less daylight (sun) that we experience here in the city of Snoqualmie on December 21st compared to June 21st.  These dates are the days on which we experience the shortest day of the year and the longest day of the year, also known as the winter and summer solstices.    

As we all know, one of the essential ingredients to growing turfgrass is sunlight.  Without sunlight, the turf has no energy and is handicapped in it's ability to utilize it's food sources to produce and maintain it's roots and shoots.  Add the stresses of nasty winter weather (remember the bitter cold temperatures of a few weeks ago?) and traffic on top of that and it is a given that you won't have a happy turfgrass plant.  

Our golf course is spread out over a large area, with each hole in it's own micro climate which is largely created by the topography of the land around it as this can determine air flow, temperature and sunlight exposure which can drastically affect turf performance from hole-to-hole.  

Take a look at the photo below.  This is hole number six and this picture was taken around 11:00 AM yesterday.  If yesterday's sunrise occurred at 7:56 AM, this means that this green got about 3 hours of sun before disappearing behind the houses and trees to the right of the cart path, leaving the green in the shade for a little over 60% of total daylight hours.  That definitely takes a toll on the turf.  

Hole #6
 Now, take a look at hole number 5 which sits in the sun for the majority of the day, due to the topography that it sits on.  This picture was taken at the same time of the day as the one above.  The entire green is basking in the sun and looking pretty happy.
Hole #5
Limited sunlight is one of the many challenges that we face when it comes to keeping the greens healthy through the winter months and with that said, we have decided to place holes #6 and #11 on temporary greens which are located just short of each green.  These greens are located in some of the most challenging micro climates on the golf course with minimal sunlight during this time of the year and in order to minimize stress to the turf, we need to give these greens some time off.  Many of you have expressed your appreciation of our proactive efforts and we appreciate your support.  As always, if you have any questions or concerns, please feel free to contact me at rgordon@tpcsr.com.

Tuesday, December 10, 2013

Dang, that was cold!

Have you ever had somebody sneak up on you and dump a bucket water over your head that is so cold that you lose your breath?  I have a feeling that is kind of how our Poa greens are feeling after this recent extended cold snap.  We set records around the Puget Sound region for low temperatures that dipped into the single digits and teens for some areas over a period of the last eight days.  Five of those days didn't even see the high temperature climb anywhere past 29 degrees.  It was COLD!

When you grow Poa, anytime you experience weather extremes whether it be extremely high or low temperatures, you get a little concerned as the possibility of turf loss becomes very real.  Extremes such as this cause Poa to lose basic physiological functions needed for survival.   Last time we experienced a deep freeze like this one was 2009 and that was a rough year for golf courses throughout the Puget Sound region, as many Poa greens were unable to handle the weather extremes and simply checked out.  

Initially, I had hoped that the deep freeze would have a little bit of moisture mixed in with it as that would have produced a little bit of snow which is one of Mother Nature's best lifelines for grass (to a certain degree of course) and would have given our turf a little warm blanket to hide under, away from the frigid temperatures.  Unfortunately, the ridge of high pressure pushed all the moisture down to Oregon where they got the snow I was hoping we would get.

The good news is that we had a little bit of lead-time in which we were able to do a few things to prepare the greens for the deep freeze in order to give the greens the best odds we possibly could.  As some of you noticed, we put a slightly heavier than normal sand topdressing application on all of our greens on the 29th.  The sand simply serves as insulation for the crowns (growing point between shoots and roots) for the plant.  While it is not as good as snow, it was better than nothing.  The other thing we have working in our favor is we mixed a little green pigment in our last spray application.  While the use of pigment has many benefits, one of them is the increase in surface temperature due to the reflection of light off a darker surface producing added insulation and quicker recovery from cold temperatures.  Otherwise, there is not much else you can do except wait for the weather to change and growing conditions to improve.

I have been surveying the golf course all week and as of today, I am feeling cautiously optimistic.  There are a few areas on the perimeters of our shady greens that look a little dinged up due to winter desiccation and may struggle through the rest of the winter a little bit.  However, with conservative traffic management, I do not anticipate any major turf loss.  The turf  on all areas will be coming out of this cold snap a little off-color, especially our roughs and bunker faces where we have a lot of fine fescue and bluegrass.  This is simply the defense mechanism of the grass dormant until growing conditions improve.

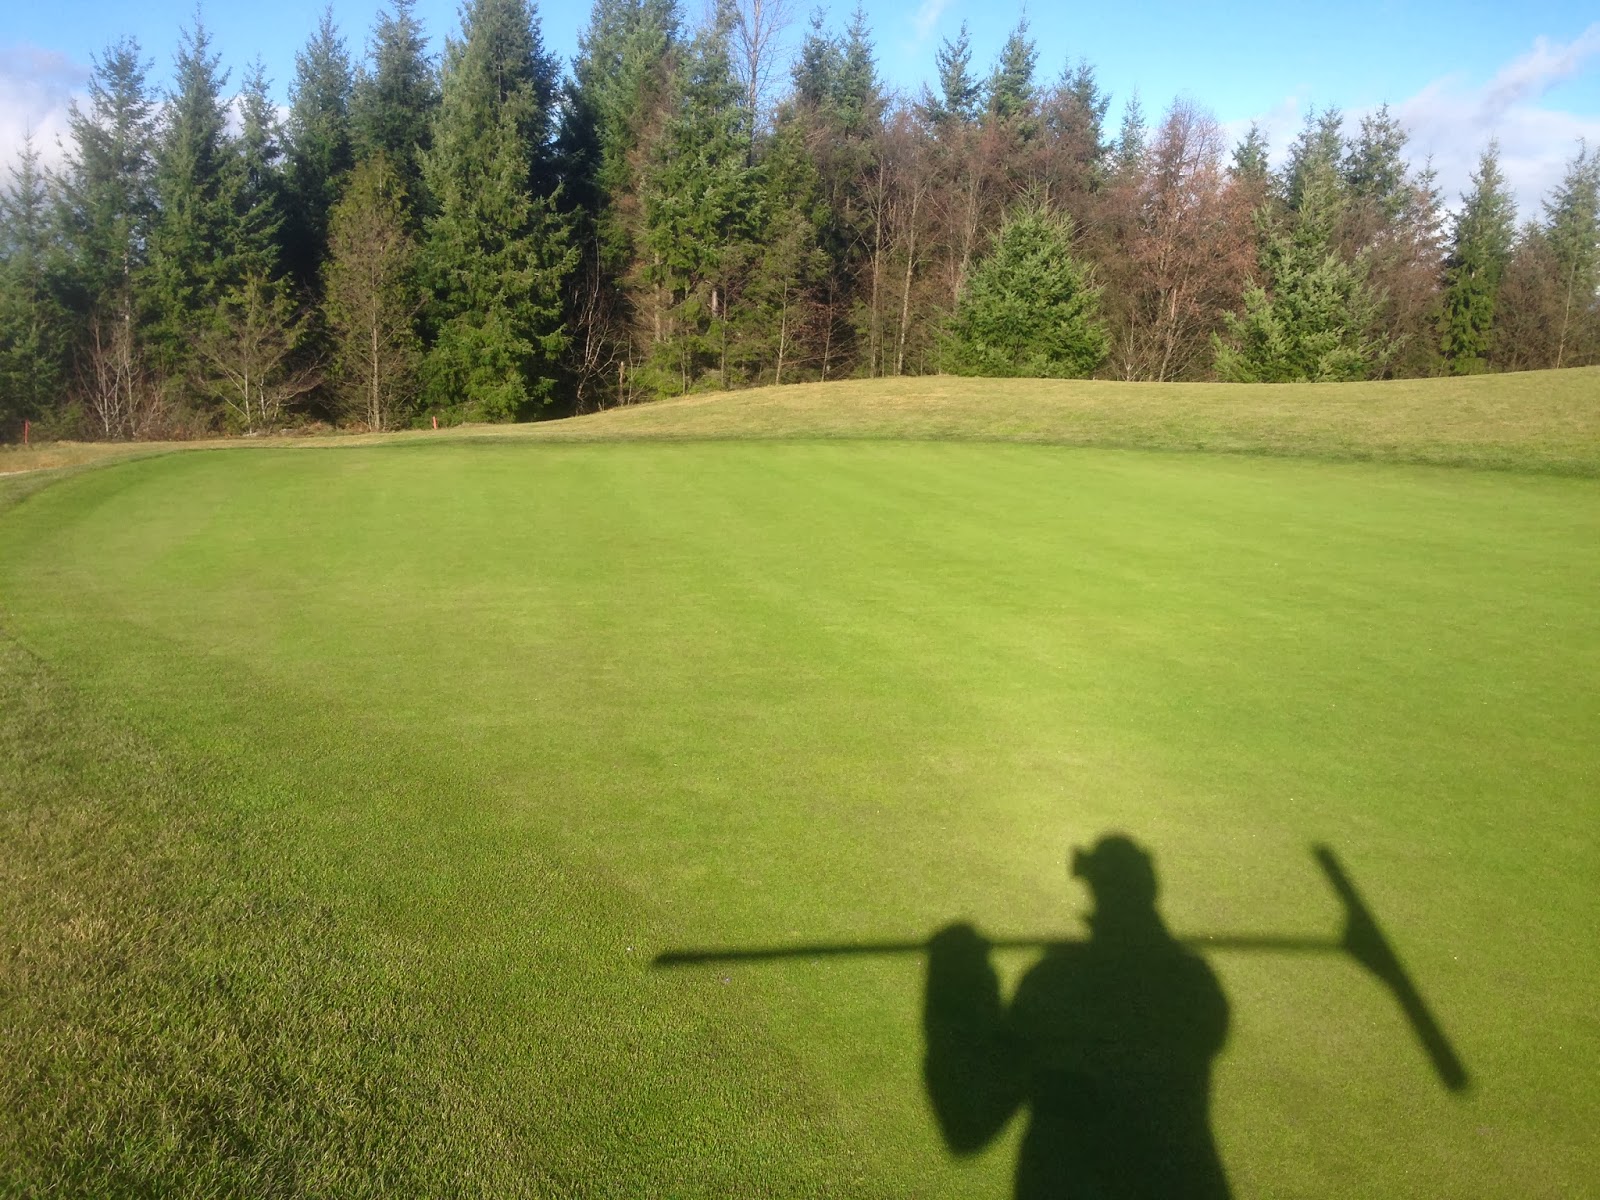
Right now, we are waiting for the green surfaces to soften up a little bit so the plants can begin re hydrating themselves and getting a little bit of rigidity back into the leaf blades as water moves back into the plant cell walls.  As of this afternoon, any traffic across the greens right now is leaving very visible footprints in which the leaf blades are slow to bounce back.  This means the Poa is not quite ready for golf.  Check out the picture below: this shows actual footprint patterns of ONE foursome playing the hole like normal.  That's why we've got to be careful not to expose the greens to traffic too soon.   The forecast is calling for temperatures to warm up into the 40's with a little bit of rain which is perfect for what we need to help the greens recover from the shock of the cold snap.


To summarize, we need to make sure we give the greens the opportunity to re-acclimate themselves so they are strong enough to handle the foot traffic from regular play without causing any unnecessary injury.  We will continue to monitor conditions and will be in constant communication with the pro-shop with further details as we want to get the golf course open again as soon as possible which should happen within the next few days.  In the meantime, thank you for taking the time to read through this LONG blog post, for your understanding and patience as we work to get the course open again and please don't hesitate to contact me if you have any questions.


Monday, November 18, 2013

Comparing Rainfall Totals

Those of you that braved the rains out on the course this past weekend and love trivia, here's a tidbit of information for you to chew on: our on-site weather station recorded 2.48" of rain between Friday and Saturday, with most of it coming down on Saturday.


Out of curiosity, I decided to pull up some old weather data records from 2011 and 2012 to see how the fall rains stack up to what we have experienced thus far in 2013.  Many of us consider September to the kick-off of the fall season so, I took a look at the time period between September 1st through November 31st for all three years.  Here's how the data stacked up:

  • September-November 2011:  19.08" Rainfall
  • September-November 2012:  11.21" Rainfall
  • September-Present 2013:  18.69" Rainfall (Through November 17th)

We still have thirteen days of data to add to the November 2013 rainfall records, however, to-date we are only 0.40" from beating the 2011 rainfall record and have already incurred 7.48" more rain than we did in 2012 during this time period.  Needless to say, I think we are on-track to end up beating the rainfall totals for the previous two years by a lot.  

Tuesday, October 29, 2013

When the Frost is on the Punkin

Photo Credit: Juan Wilson on 28 October 2010 for Island Breath - 
(http://islandbreath.blogspot.com/2010/10/frost-on-pumpkin.html)


It finally happened.....Frost on the Punkin!  I had to scrape a good layer of ice off my windshield this morning and our fairways, roughs and tees were covered with billions of gleaming white ice crystals when I pulled into the shop parking lot at 5:30 AM.  While this frost was not quite a full-blown hard frost (the low was 33 degrees) it did put a kink in the maintenance crew's plans for the day as we had to wait a few hours before starting some of our planned tasks and ate into our head start on play a bit.  Luckily it did not affect our regular 9:00 AM tee times this time around.

Following Mother Nature's cue, I figured now would be a good time to review a little bit on frost protocols here at the club as it pertains to golf course prep and tee times.  Now to state the obvious, frost delays are something that none of us like to experience because as I mentioned above, it steals precious time away from the maintenance crew's head-start on play and does the same to the valuable playing time of our members.  
It messes up plans for everyone involved, simple as that.  

However, at the end of the day we are all in this together as we have the common goal of making sure that the golf course is looked after in order to provide the best playing conditions not just right now but next week, next month and next year as well.  In order to do that, sometimes we have to make decisions that look past the short-term.  Managing frost delays appropriately is one of them.


Here is what we ask of our members and guests during frost:
  • Before coming to the club to play, track the weather.  A basic rule of thumb is when predicted temperatures are to be around the 40 degree mark or colder, chances of frost are high.
  • Upon arrival at the club, please check in with the pro shop for the thumbs-up to use the range tee and putting green before starting your day.  Normally, the putting green and range are among the first to clear and delays for these areas are usually minimal.  We do have our covered hitting bay on the South end of the range for your use during those prolonged delays.  
  • Get confirmation from the pro shop that it is OK to tee off on the first tee before proceeding.  Sometimes, things may not be what they seem.  Our first two holes have tall Douglas Firs around them that block out the morning sun and significantly prolong the burn-off of frost relative to the greens that you can see around the clubhouse (putting greens, #18 and #10).  
  • Keep your cart on the cart path.  Often times, we will allow play to begin before the frost has fully cleared off shady areas of our fairways and roughs (but has cleared off our greens).  This is a calculated risk that we take as well as a concession that we make in the name of providing excellent customer service.  Please take this request seriously and be considerate of your golf course.  
Fir trees blocking morning sun on #1 green.

We do our best to provide estimates of if and when frost will clear, however, this is often very difficult if not impossible to do.  Truth be told, if I had the ability to predict this with 100% accuracy, I would be a self-made millionaire and probably on a beach somewhere in Hawaii.  (Insert big grin here).  Each frost delay is evaluated on a case-by-case basis and we will do our best to communicate the progression of the thaw-out through the pro shop.  

One thing that many of us often forget is that even after the frost clears, the maintenance staff still needs to get out on the turf to prepare the course for play in front of golfers and this takes time.  We do not mean to prolong the delay as our goal is to provide you and those after you with the best possible playing conditions that day whether that means mowing the greens, cutting a fresh cup or raking the bunkers.  Now enough business talk, here is a nice little poem by James Whitcomb Riley (1853-1916) to get you in the mood for frost season:

"When the Frost is on the Punkin"
WHEN the frost is on the punkin and the fodder's in the shock,
And you hear the kyouck and gobble of the struttin' turkey-cock,
And the clackin' of the guineys, and the cluckin' of the hens,
And the rooster's hallylooyer as he tiptoes on the fence;
O, it's then the time a feller is a-feelin' at his best,         
With the risin' sun to greet him from a night of peaceful rest,
As he leaves the house, bareheaded, and goes out to feed the stock,
When the frost is on the punkin and the fodder's in the shock.
  
They's something kindo' harty-like about the atmusfere
When the heat of summer's over and the coolin' fall is here—  
Of course we miss the flowers, and the blossoms on the trees,
And the mumble of the hummin'-birds and buzzin' of the bees;
But the air's so appetizin'; and the landscape through the haze
Of a crisp and sunny morning of the airly autumn days
Is a pictur' that no painter has the colorin' to mock—  
When the frost is on the punkin and the fodder's in the shock.
  
The husky, rusty russel of the tossels of the corn,
And the raspin' of the tangled leaves as golden as the morn;
The stubble in the furries—kindo' lonesome-like, but still
A-preachin' sermuns to us of the barns they growed to fill;  
The strawstack in the medder, and the reaper in the shed;
The hosses in theyr stalls below—the clover overhead!—
O, it sets my hart a-clickin' like the tickin' of a clock,
When the frost is on the punkin and the fodder's in the shock.
  
Then your apples all is gethered, and the ones a feller keeps  
Is poured around the cellar-floor in red and yaller heaps;
And your cider-makin's over, and your wimmern-folks is through
With theyr mince and apple-butter, and theyr souse and sausage too!...
I don't know how to tell it—but ef such a thing could be
As the angels wantin' boardin', and they'd call around on me—  
I'd want to 'commodate 'em—all the whole-indurin' flock—
When the frost is on the punkin and the fodder's in the shock.

Tuesday, October 15, 2013

Fall 2013 Greens Aerification in the Books!

It has been exactly twenty-one days since we core aerified and sanded our greens.  I wanted to share the following sequence of photos, showing the healing process.  Each photo was taken at 10 day intervals, beginning on the day that we aerified the greens.  Notice the progression of the holes getting smaller and the sand working itself into the turf canopy as time passes.

September 24th- day of aerification

October 4th- 10 days later.

October 14th- 20 days later.
One of the most important things that we do during the aerification process is add sand to the putting surface.  This accomplishes a few fundamental things:

  • Dillutes thatch buildup.  If left unchecked, thatch can cause the green to become spongy and prone to disease and weeds.
  • Firms up putting surface.  This enhances ball roll and reduces pitting from balls landing on the green.
  • Smooths out the putting surface.  The addition of sand smooths out the low spots for a truer ball roll.
Last winter on a hunch, we took a hard look at our sand source and found through professional lab testing, that the quality control on our existing sand source had declined below our standards and had ratios of silt and clay that were much too high.  Silt and clay are not ideal additions to a greens profile as these are tiny particles that can clog up pore space, reducing water infiltration rates and gas exchange capabilities (oxygen).  After a lot of testing and research, we were fortunate enough to find another pit in the area that produced a exemplary sand that was compatible with the existing sand in our greens profile.  

This fall was the first time we had used the new sand source in the aerification process and we immediately noticed a significant difference with how easy the sand fell into the holes and worked itself into the profile.  There was not as much "bridging" of sand across the holes which meant we were able to add more sand than ever before to the greens profile.  The sand was not as sticky (less silt and clay), so it was much easier to work it into the canopy which promoted faster healing time and less wear and tear on our mower blades.  

To summarize, the new sand made everyone happy.  The agronomy crew did not have to work as hard to get the sand into the profile, our mechanic did not have to work as hard to keep the mower reels sharp and our membership got to putt on grass rather than sand sooner than past aerifications!    

Friday, August 2, 2013

New Practice Green Open!

Those of you that have been following our progress on the south end of our practice facility, you have probably already noticed that the second green officially opened up for play last weekend.  The green is still only 16 weeks old and has been completely grown in using aerification plugs from our existing greens.  

South end practice facility.  New green in the background and existing chipping green in the foreground.

This green will eventually become our South-end practice putting green in the coming months but for now, it is our chipping green as the trueness of the surface needs a little bit more time to mature.  In the meantime, it has become dense enough and strong enough to handle regular foot traffic and pitch marks from balls.  We wanted to offer our membership a variety of options to practice their short game this season thus, we have accelerated the process and temporarily made our chipping green in this area (which was grown-in the exact same way in 2010) the putting green as the quality of the surface on this green is much truer and more conductive to ball-roll right now.

The turf is still filling in and has come a long way in the last 16 weeks.

We are slowly dropping the height of the new green to match up with the rest of the greens, right now they are 75 thousands of an inch apart in height.  We will continue to implement cultivation practices such as topdressing, verticutting and frequent mowing which will promote the quality putting surface that we desire. 

Fresh mow on the green, right before the inaugural cups were cut.  The area around this green will be removed and replanted in September/October.

 This fall we will continue the renovation of the south end practice area by removing much of the remaining bentgrass that was left over from the old green and growing in a new approach area between the two greens using fairway aerification plugs that will be used to pitch balls over the bunker onto the chipping green.  The smaller areas on the left and right hand side of the new green will be converted to rough height as to frame the green a little better.  This project will wrap up by switching the two greens back to their original chipping/putting designations at the start of the 2014 golfing season.   

Inaugural cups are cut and the green is ready for some chipping action!


Friday, June 14, 2013

Venting Greens

From time to time, you may observe our staff performing a process called "venting" on our greens this summer.  Just like you and I, the greens need to breathe and the venting process is a way for us to get oxygen back into the soil profile and promote healthy gas exchange between the soil and the atmosphere.  In order to produce tournament-caliber green speeds we have to subject the greens to a lot of mechanical traffic with our mowing and rolling equipment.  Combined with heavy foot traffic from golfers, this creates compaction and can over time, seal off the surfaces and create an unhealthy anerobic environment for the turfgrass. 

The imapct on the playability of the greens surface with the venting process is very different than the traditional "aerification" process that we peform ever Spring and Fall.  During the traditional process, we remove a 5/8" core and topdress heavily with sand which makes the green bumpy. 

The difference with the venting process is that we use a solid tine comparable to the size of a pencil that does not remove any material from the green.  Many of you won't even notice that we have done the process because once we run our greens roller over the surface, any visual evidence of the holes disappears and the surface rolls just as true as it did before.  That's it.  Nothing to it!  Here are some pictures to illustrate:


Running the pencil tines over the green with our aerifier.


On the left, is what the green looks like right after it is vented.  On the right is what it looks like after we rolled the green after venting.  You can't even tell we did anything.


Here is a picture of an aerification hole that we found in our soil profile.  The Area between the red lines is a channel from the aerification process last Spring.  You can see that the roots in this area are bright white, healthy and happy.  This shows how important oxygen is to the roots of our greens.

Thursday, May 9, 2013

Experimenting with Tenacity


You may have noticed a few of our bunker faces have suddenly developed spots of white, bleached out looking grass.  Once again, this is something that has occurred intentionally through our own doing.  We have been experimenting with a  new product called Tenacity, a selective herbicide on a handful of bunker faces  in an attempt to eliminate a weedy grass called velvet grass (Holcus genus).  This weedy grass is coarse, ugly and does not blend well with our finer textured turf.  It has been difficult to control over the years due to the limited number of selective weed control product options for this particular type without harming the desirable turf around it.   As a result, the population has multiplied quite a bit over the years and can be found on many of our bunker faces and certain areas of our roughs.   

We obtained a small sample of Tenacity from our chemical rep to play with and applied it about two weeks ago with a backpack sprayer on some of our worst bunker faces (behind #6 green and #12 green) to see what it would do.  It is kind of cool the way the product works as you can see in the pictures.  My product literature from Sygenta explains how it works as follows:

"Tenacity is a new turf herbicide with a novel mode of action based on a naturally produced compound from the bottlebrush plant which prevents formation of carotenoids in susceptible plant species.  Without carotenoids, light energy and by-products of photosynthesis destroy cholorophyll and cell membranes resulting in bleaching of leaves, followed by necrosis and death of the plant."


Our plan is to continue to monitor the results, learn from what we see, figure out what type of over seeding we need to do if any and make an educated decision on if and how we may formulate a plan using this product for the golf course moving forward.  This type of work will likely need to be done in the spring or fall to get the response/recovery that we need to be successful.  Either way,  so far this product looks like it is pretty cool and I am looking forward to figuring out the best way to possibly incorporate this into our agronomy plan for next season.

Wednesday, May 1, 2013

Staff Training & Embark, 29 Days Later...

So far, this season's agronomic plan is coming together nicely which is reflected in current course conditions.  A big part of that is, we have been working hard to get our crew trained/retrained for the season.  Some of the things we have been emphasizing include cause/effect of our decision making skills, attention to details and promoting pride in one's work on the golf course.  Like the old saying goes, there is always room for improvement.  Here is a photo of Assistant Superintendent, Danny Vandecoevering going over the details of today's tasks with our team. 


You will notice in the background, that we have a flat screen TV with a picture of #2 tee complex displayed.  Both Assistants, Danny and Jose have been utilizing our Apple TV on a regular basis (new this year) to show the crew photos of specific things on the golf course that we need to work on doing better. 

There is never a day that we go home at the end of the day and think, "Boy, what a great day, everything is just perfect and completely done!"  There is always something to do, a project to work on, something to improve or polish up.  Regardless, we are getting closer and closer to our goals and look forward to checking more things off the list while building the BEST agronomy team that we have ever had here at TPC Snoqualmie Ridge.

On a different subject, in the photos below, you can see that the results of the Embark treatment that was applied on April 2nd is looking amazing.  Check out the following pictures, this is what the fairways look like 29 days after treatment- greener, denser and seedheads are not a major player anymore.  If you do not know what I am talking about, check out my previous post! 


#9 & #10 Complex


#14 Fairway.  Compare this photo to the one in the previous post that showed this fairway 14 days after treatment.  I think you will notice a difference!


#12 Fairway.

Tuesday, April 23, 2013

Embark


Some of you have asked about our fairway turf looking "bronzed" lately.  Would you be surprised if I told you that we sprayed a chemical to do that on purpose fully aware that this would happen?  Because, we did.  On the 2nd of April, we applied a plant growth regulator (PGR) called Embark.  If you don't remember us doing this last year, it is because this is the first year that we have ever treated the fairways with this PGR.  Some of you may think, well doesn't the bronzing effect contradict what many would call nice green turf?  The answer is yes, but only temporarily.  In our case, the application of this chemical serves three different purposes:
  • Seedhead Control:  Our fairways are over 90% Poa annua.  With that, comes the spring flush of white seedheads that suck the plants dry of valuable carbohydrates (energy) which weakens the turf.  If we can prevent seedhead production, the plant is able to divert carbohydrate production to root and shoot health rather than ugly seedheads.
  • Turf Color and Density:  While the fairways may look bronzed, this is only temporary and a slight side effect worth overlooking because the dividends are great.  Basically, the cool thing is, after about 30 days from the initial spray, the color change reverses and the turf sprayed with Embark is greener and more beautiful all season long than the turf that was untreated.  (I will post pictures of side by side plots of treated/untreated turf later).  We are also able to partially mask the effects of the bronzing with a couple applications of Iron in the weeks following the initial treatment of Embark.
  • Wet-Season Growth Regulation:  When the fairways are wet, it is extremely difficult to mow and maintain them with our heavy equipment.  Therefore, for the 30 days that the grass is under the regulation of Embark, we can pick and choose our days to mow to fit weather conditions and not be forced to play our hand too soon and cause unnecessary damage with our mowers.  (By the way, total rainfall on the golf course was 5.5 inches in March and as of today, the 23rd of April, we have recorded 9.10 inches of rain since the 1st of April!)


Spraying Embark.  We added a green pigment to help mask initial bronzing.

Bronzing effect, 15 days after application.


Monday, April 8, 2013

Greens Aerification...Check!

It is funny, every year right around aerification time I usually get asked the question, "So, are you guys excited to aerify greens?" as if we eagerly count down the days until we are able to go and punch a billion holes in the greens and bury them in sand.  The truth is, no, I do not get my jollies from this contrary to popular belief.  It is kind of like going to the dentist every six months for your cleaning; you know it is good for you so you do it but you do not necessairly look forward to it. 

In terms of grass, this translates to: we do it because it is a necessary cultural practice to maintain healthy grass and promote good playing surfaces.  The process is a lot of work and stress on myself and the crew but let me tell you, when all is said and done it feels GREAT!  This year's weather for greens aerification was fantastic (aside from Tuesday's constant fog/mist), we had the dry days that we needed to get the sand into the holes, pulled a great plug, nothing broke down and the crew worked hard and did a fantastic job!   

Here is a great two minute video from the USGA that gives a little bit more detail on the aeration process along with a few pictures from our own aerification.


Aerification Plugs pulled from the putting green
Beautiful morning for punching!  This was what the weather was like on Monday.
Blowing the sand into the holes in difficult foggy weather on Tuesday.

The sun came back on Wednesday and helped us (dry sand goes into holes better!) and helped us finish up!

Wednesday, March 13, 2013

What are those Purple Spots?

First, let me say, No . . . Harold and his purple crayon did not pay a visit to our golf course.  Remember this classic book from your childhood?  I read this to my three-year old son Knox at bedtime last night and in the book, everything is purple.  Kind of like those funny looking spots on our greens and fairways.


Anthocyanin pigmentation on a green 

I thought I would take the opportunity to explain what exactly is causing these spots to suddenly appear as of late.  This phenomenon is brought on by swift temperature changes between day and night or mild weather followed by colder periods.  Sounds a lot like our weather in March and April doesn't it? 

Typically, our turf is green thanks to a pigment inside the plant called chlorophyll.  However, when we experience fluctuating weather patterns, another pigment called anthocyanin temporarily replaces cholorophyll as the main pigment in the turf.  This pigment is found in many other colorful plants throughout the plant kingdom such as the purple petunias that we hang around the clubhouse in the summertime or the red geraniums on your back patio. 

Anthocyanin pigmentation on a fairway.
Not all grass plants demonstrate the effects of anthocyanin as it can be limited to certain bio types of turf (we have thousands upon thousands here at TPCSR) which becomes even more apparent as the changes in pigmentation kick in.  Those biotypes that turn purple are producing sugars in the leaf on those relatively warm, bright sunny days.  However, when night rolls around, temperatures drop significantly and the plant is unable to move these sugars down into the plant.  With these sugars stuck in the top portion of the plant, they bind to our friend, anthocyanin and displace chlorophyll (the green pigment) causing the turf to temporarily turn purple.

This biological phenomenon does not harm our turf and is simply a part of Mother Nature's quirks.  It is also interesting to note that these spots tend to appear with stronger intensity on our more exposed areas which makes sense because these areas experience the greatest temperature fluctuations.  (Think wide-open North end putting green versus sheltered #2 green).  Once the weather patterns stabilize towards May and June, chlorophyll will once again become the main pigment in our turf.

Saturday, March 2, 2013

Wiedenmann Super 500 Service Work

Coming up in the next month or two, you will begin to notice the agronomy staff doing a number of things to our fairways- aerifying, verticutting and sanding.  The weather during March and April is very touch-and-go with the days jumping from nice and dry to miserable and wet in the blink of an eye.  Weather is the primary factor that determines how fast all of the aforementioned practices occur not because we don't like to work in the rain, but because our equipment is heavy and we do not want to cause any unnecessary damage to the turf.  

Experience has taught us that we must be ready to take advantage of ideal weather conditions at a moment's notice.  This is why our head mechanic, Rick has spent the last month readying every piece of equipment involved in this process.  Every Spring and Fall when we send this equipment out, things get worn out- belts, tines, blades, bearings, chains and so on.  It is amazing how hard our golf course can be on our equipment and our mechanic.
  
Rick taking a look at the condition of our blades and paddles on the drum.

Here is a quick look at the blades from our Wiedenmann Super 500 that we use to verticut fairways.  Rick spent three straight days replacing all of these blades and paddles on the drum inside the machine.  Very tedious work as he had to clean the threads of each nut and bolt of dirt and rust for each individual assembly, remove the old stuff, slide on the new one and then bolt on the new blades and paddles.  All of this had to be done in a 6" wide access point, making for some challenging work with hand tools.  The blade on the top of the picture below is brand new and the one on the bottom is a worn-out blade that was replaced.  Notice the difference between the two?  It is pretty apparent that we wore these out pretty good last fall.  Thanks for all of your hard work Rick! 

Worn out blade vs. brand new blade from the Wiedenmann Super 500 verticutter.
Here is how the blades and paddles are arranged on the drum inside the machine.  

Wednesday, February 27, 2013

What have we been up to?

Replacing three of our 24 station controllers on #13 with a brand new 72 station Rainbird Par ES controller.
This will enable us to use the old ones as backup parts for the rest of our system as they do not make our specific model of irrigation controllers anymore!

Yes, we started another drainage project on the right of #11 near the tree line today.  This hole has come a long way since last season in terms of how it drains. 


Here is another small drainage project we knocked off the list last week in the middle of #11 fairway.

We had a fitting on one of our 2" lateral lines that sprung a slow leak on the 18th fairway, making the area wet.  As our system ages, we have been seeing fittings fail in this manner on a more frequent basis.  We dug it up, cut the pipe, replaced the fitting and put it back together.  It took a bit of time to get this one fixed as the sides of the hole kept caving in on top of the pipe, making for some difficult and frustrating work.  Finally got it taken care of though!

Just a quick shot of #14.  I am loving the back and white mowing pattern on the fairways, it looks so clean!

Thursday, February 21, 2013

Restoring #14 Greenside Bunker

One of the things on our project list this winter was to give the right green side bunker on #14 a little bit of a face lift through some restorative re-grading, sodding and irrigation work. 

Over the years, the grass bank in the line of play leading up to the green had accumulated a large deposit of bunker sand on top of the original grade ultimately compromising the original design.  This happens over time through thousands upon thousands of shots being played out of the bunker with each shot splashing a little bit of bunker sand onto the grass.

This sand buildup creates a tall, inverted lip that interferes with the ability to blast a shot out of the bunker, not to mention it is ugly.  The lip also becomes weak and subject to breaking away when a golfer or animal tries to climb up the face due to the loosely held structure of sand.  This has caused the edge of the lip to creep higher and higher up the face with each passing year since the only fix is to trim the edges even again with a sod shovel. 
 

Removing the turf and buildup to find the original grade.  Notice the tall lip.

 
Jose, Baudellio and Jorge beginning the demolition aka restoration work.
 Once we got all of the excess sand and sod stripped off, we took a break from the demolition and turned our attention to improving the irrigation of the turf.  This bunker bank faces South where a lot of our summer-time heat comes from and when compounded with the near-vertical nature, the rootzone struggles to hold water. 
To solve this problem, we decided to experiment with something called sub-surface drip irrigation.  The material comes from Toro and is made of flexible black plastic hose with tiny holes at regular intervals.  The inside of this hose is lined with a chemical that repels any sort of root growth from occurring inside.  In theory, this concept should work well on this bunker bank because we will be able to water directly into the rootzone at low precipitation rates, giving the soil time to absorb the moisture.  This is as opposed to relying on overhead irrigation with much higher precipitation rates leading to higher runoff and less water absorbed on the vertical grade.  Sounds solid right?  I hope so!  The true test will occur this summer when the heat hits. 

A few weeks before beginning the project, we added a 1" water line from one of our 2" laterals to supply the water for our sub-surface irrigation installation.  Notice the original turf grade of this bunker in the background.


We mapped out the spacing for our drip-hose at 12" spacing between each line.


Next, we added a manifold to the 1" line and added the flexible pipe to follow the 12" spacing intervals across the entire bank.


Each painted line that you see was carefully excavated to about 2"-3" deep, laid with pipe then re-sodded.

Irrigation Tech, Matt Pierce cutting pipe to size.

Once all the irrigation was installed, the next step was to put it all back together with sod and staples.

This face is so steep that the staff got creative and used a ladder to maintain their footing during sodding.

The finished product.  Notice that the lip has been moved back down about 1.5 feet from where it was prior to the restorative work being performed.

We are excited to see how this bunker performs in the upcoming season with the restorative sodding, grading and irrigation work that was done in this project.  I expect that the sod lines will continue to heal and close up as the weather warms up and becomes conductive to growing grass. 

Before I close this post, I would like to give my personal thanks to Carl Taylor from Toro for his contribution to this project.  He came out and worked alongside with Matt on the irrigation installation and provided much of the design consultation.  The reconstructive sodding work was also a big undertaking performed largely by our staff members, Derek, Jose, Danny and Matt.  Great job guys and thank you!